Table of Content
What’s three-layer architecture?
Layer indicates the logical separation of components. Layered architecture concentrates on grouping related functionality within an application into distinct layers that are stacked vertically on top of each other. Each layer has unique namespaces and classes.
An N-layer application may reside on the same physical computer (same tier); each layer's components communicate with another layer’s components by well-defined interfaces.
In C#, each layer is often implemented in a Dynamic Link Libraries (DLL) file.
To help you understand more about the n-layer architecture, I’ve put together all pieces of information about three-layer with a practical example in this article as follows:
- Presentation layer
It is the first and topmost layer present in the application where users can interact with the application. - Business Logic layer
This is the middle layer - the heart of the application. It contains all business logic of the application, describes how business objects interact with each other, where the Presentation layer and Data Access layer can indirectly communicate with each other. - Data Access layer
The Data Access layer enforces rules regarding accessing data, providing simplified access to data stored in persistent storage, such as SQL Server.
It is noteworthy that this layer only focuses on data access instead of data storage. It may create a bit of confusion with the Data-tier in a three-tier architecture.
Advantages of three-layer architecture
- Explicit code: The code is separated into each layer. Each one is dedicated to a single responsibility such as interface, business processing, and querying instead of bundling all the code in one place.
- Easy to maintain: As its roles separate each layer, it would be easier to change something. The modification can be isolated in a single layer or affected only the nearest layer without affecting the whole program.
- Easy to develop, reuse: When we want to modify a function, we can easily do that as we already have a standard architecture. In case we want to alter a complete layer such as from Winform to Web form, we only need to implement to replace the Presentation layer; other layers can be reused completely.
- Easy to transfer: We could save time on moving the application to others as they have a standard architecture to follow and apply.
- Easy to distribute the workloads: By organizing the code into different layers based on its responsibility, each team/member can write their code on each layer independently, which in turn helps developers control their workload.
How does it work?
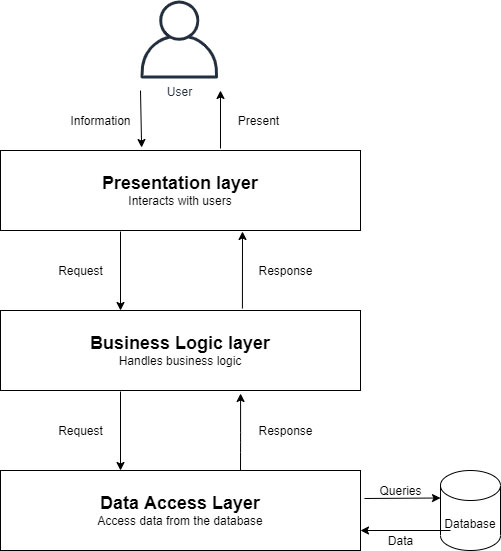
In three-layer architecture, the Presentation layer doesn’t communicate directly with the Data Access layer. The Business Logic layer works as a bridge between the Presentation layer and the Data Access layer. The three-layer architecture works as follows:
- The Presentation layer is the only class that is directly interacted with the user. It is mainly used for presenting/collecting data from users, then passes them to the Business Logic layer for further processing.
- After receiving information from the Presentation layer, the Business Logic layer does some business logic on the data. During this process, this layer may retrieve or update some data from the application database. However, this layer doesn’t take responsibility for accessing the database; it sends requests to the next layer, the Data Access layer.
- The Data Access layer receives requests from the Business Logic layer and builds some queries to the database to handle these requests. Once the execution gets done, it sends the result back to the Business Logic layer.
- The Business Logic layer gets responses from the Data Access layer, then completes the process and sends the result to the Presentation Layer.
- The Presentation layer gets the responses and presents them to users via UI components.
The diagram below illustrates how three-layer architecture works.

How to build and deploy a three-layer application in C#?
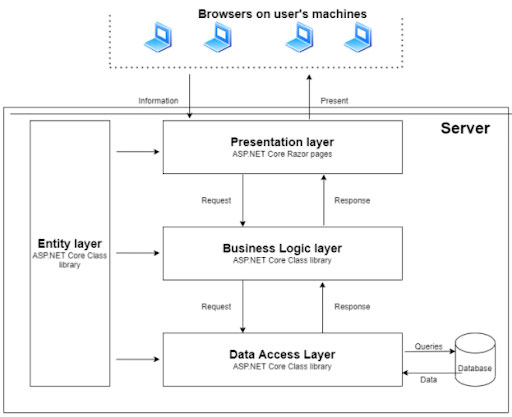
To guide you build and deploy a three-layer application, I have prepared a demo with the following components:
- Business Objects - Entity(Data Transfer Objects) layer: .NET Core class library
- Data Access layer: .NET Core class library
- Business Logic layer: .NET Core class library
- Presentation Layer: ASP.NET Core 5.0 Razor pages
The Business Objects layer includes objects that are used in the application and common helper functions (without logic) used for all layers. In a three-layer architecture, this layer is optional. However, as we follow the OOP with C#, we should reduce the duplicate codes as much as possible. Therefore, using a layer to keep common codes instead of holding them in each layer is essential.
To easily follow the article, you can download the demo of the three-layer architecture sample. It is built based on Repository + UnitOfWork pattern, which’s a well-designed pattern in C#. Here are the demo and practical examples of the Repository + UnitOfWork pattern.
The diagram below explains how the application was designed.


Database
Firstly, create a database with the design below to store the application’s data. You can execute the ThreeLayerSample.Database.sql, which was placed inside the Data Access layer to create it.
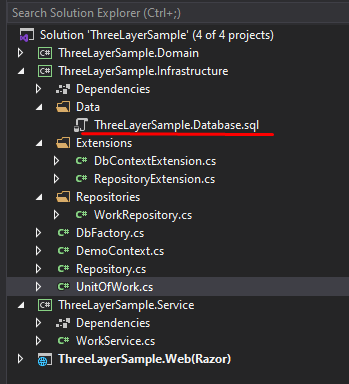

The demo will focus on getting the Work table items before representing them to users.
Business Objects/Entity layer
ThreeLayerSample.Domain class project in this example.
1. Connect to the database with Entity Framework Core
When we have the database, we need to create a mapping between the database and the application.
Let’s open your Package Manager console in this layer, run a Scaffolding command, then replace SERVER, DATABASE, USER, and PASSWORD with suitable values based on your SQL Server settings.
Scaffold-DbContext "Data Source=SERVER;Initial Catalog=DATABASE;Persist Security Info=True;User ID=USER;Password=PASSWORD;MultipleActiveResultSets=True" Microsoft.EntityFrameworkCore.SqlServer -OutputDir Entities -ContextDir Context -Context DemoContext -f
Once the command has finished, the database tables should be created into the code and name entities. As the entities could be used in all layers without any database or business logic, we should keep them in this layer.
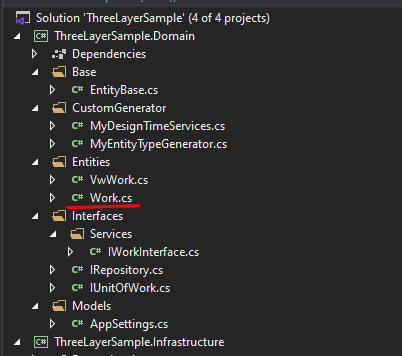

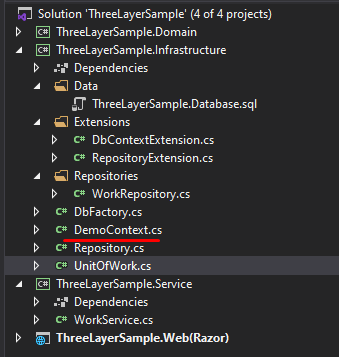
A DataContext class named “DemoContext” is also created. This class provides database access, so it should be placed in the Data Access layer.

2. Create Generic interfaces for Repository and UnitOfWork
All data entities should have CRUD actions, so let’s create a generic interface named IRepository, and then the repository of each entity should implement this interface.
ThreeLayerDomain/Interfaces/IRepository.cs
using System.Collections.Generic;
using System.Threading.Tasks;
using Microsoft.EntityFrameworkCore;

namespace ThreeLayerSample.Domain.Interfaces
{
   	public interface IRepository<T> where T : class
	{
    	DbSet<T> Entities { get; }
    	DbContext DbContext { get; }
    	/// <summary>
    	/// Get all items of an entity by asynchronous method
    	/// </summary>
    	/// <returns></returns>
    	Task<IList<T>> GetAllAsync();
    	/// <summary>
    	/// Fin one item of an entity synchronous method
    	/// </summary>
    	/// <param name="keyValues"></param>
    	/// <returns></returns>
    	T Find(params object[] keyValues);
    	/// <summary>
    	/// Find one item of an entity by asynchronous method
    	/// </summary>
    	/// <param name="keyValues"></param>
    	/// <returns></returns>
    	Task<T> FindAsync(params object[] keyValues);
    	/// <summary>
    	/// Insert item into an entity by asynchronous method
    	/// </summary>
    	/// <param name="entity"></param>
    	/// <param name="saveChanges"></param>
    	/// <returns></returns>
    	Task InsertAsync(T entity, bool saveChanges = true);
    	/// <summary>
    	/// Insert multiple items into an entity by asynchronous method
    	/// </summary>
    	/// <param name="entities"></param>
    	/// <param name="saveChanges"></param>
    	/// <returns></returns>
    	Task InsertRangeAsync(IEnumerable<T> entities, bool saveChanges = true);
    	/// <summary>
    	/// Remove one item from an entity by asynchronous method
    	/// </summary>
    	/// <param name="id"></param>
    	/// <param name="saveChanges"></param>
    	/// <returns></returns>
    	Task DeleteAsync(int id, bool saveChanges = true);
    	/// <summary>
    	/// Remove one item from an entity by asynchronous method
    	///
    	/// </summary>
    	/// <param name="entity"></param>
    	/// <param name="saveChanges"></param>
    	/// <returns></returns>
    	Task DeleteAsync(T entity, bool saveChanges = true);
    	/// <summary>
    	/// Remove multiple items from an entity by asynchronous method
    	/// </summary>
    	/// <param name="entities"></param>
    	/// <param name="saveChanges"></param>
    	/// <returns></returns>
    	Task DeleteRangeAsync(IEnumerable<T> entities, bool saveChanges = true);
	}
}
We need another interface named IUnitOfWork as follows:
ThreeLayerDomain/Interfaces/IUnitOfWork.cs
using System;
using System.Threading;
using System.Threading.Tasks;
using Microsoft.EntityFrameworkCore;

namespace ThreeLayerSample.Domain.Interfaces
{
	public interface IUnitOfWork : IDisposable
	{
    	DbContext DbContext { get; }

    	/// <summary>
    	/// Get repository instance of an entity inside UnitOfWork scope
    	/// </summary>
    	/// <typeparam name="T"></typeparam>
    	/// <returns></returns>
    	IRepository<T> Repository<T>() where T : class;
    	/// <summary>
    	/// Saves changes to database, previously opening a transaction
    	/// only when none exists. The transaction is opened with isolation
    	/// level set in Unit of Work before calling this method.
    	/// </summary>
    	Task<int> SaveChangesAsync(CancellationToken cancellationToken = default);
    	Task BeginTransaction();

    	/// <summary>
    	/// Commits the current transaction (does nothing when none exists).
    	/// </summary>
    	Task CommitTransaction();

    	/// <summary>
    	/// Rolls back the current transaction (does nothing when none exists).
    	/// </summary>
    	Task RollbackTransaction();
	}
}
They are interfaces without business/database logic here, so I put them in this layer.
Data Access layer
ThreeLayerSample.Infrastructure class project in this example.
1. Implement generic classes
By applying Generic Repository and Unit of Work design patterns, the data access layer classes are implemented as follows:
ThreeLayerSample.Infrastructure/Repository.cs
using System.Collections.Generic;
using System.Linq;
using System.Threading.Tasks;
using Microsoft.EntityFrameworkCore;
using ThreeLayerSample.Domain.Interfaces;

namespace ThreeLayerSample.Infrastructure
{
   	public class Repository<T> : IRepository<T> where T : class
   	{
          	public DbSet<T> Entities => DbContext.Set<T>();

    	public DbContext DbContext { get; private set; }

          	public Repository(DbContext dbContext)
          	{
                 	DbContext = dbContext;
    	}

          	public async Task DeleteAsync(int id, bool saveChanges = true)
          	{
                 	var entity = await Entities.FindAsync(id);
                 	await DeleteAsync(entity);

                 	if (saveChanges)
                 	{
                       	await DbContext.SaveChangesAsync();
                 	}
          	}

          	public async Task DeleteAsync(T entity, bool saveChanges = true)
          	{
                 	Entities.Remove(entity);
                 	if (saveChanges)
                 	{
                       	await DbContext.SaveChangesAsync();
                 	}
          	}

          	public async Task DeleteRangeAsync(IEnumerable<T> entities, bool saveChanges = true)
          	{
        	var enumerable = entities as T[] ?? entities.ToArray();
        	if (enumerable.Any())
                 	{
                       	Entities.RemoveRange(enumerable);
                 	}

                 	if (saveChanges)
                 	{
                       	await DbContext.SaveChangesAsync();
                 	}
          	}

    	public async Task<IList<T>> GetAllAsync()
          	{
                 	return await Entities.ToListAsync();
          	}

          	public T Find(params object[] keyValues)
          	{
                 	return Entities.Find(keyValues);
          	}

          	public virtual async Task<T> FindAsync(params object[] keyValues)
          	{
                 	return await Entities.FindAsync(keyValues);
          	}

          	public async Task InsertAsync(T entity, bool saveChanges = true)
          	{
                 	await Entities.AddAsync(entity);

                 	if (saveChanges)
                 	{
                       	await DbContext.SaveChangesAsync();
                 	}
          	}

          	public async Task InsertRangeAsync(IEnumerable<T> entities, bool saveChanges = true)
          	{
                 	await DbContext.AddRangeAsync(entities);

                 	if (saveChanges)
                 	{
                       	await DbContext.SaveChangesAsync();
                 	}
          	}
   	}
}
ThreeLayerSample.Infrastructure/UnitOfWork.cs
using System.Collections.Generic;
using System.Data;
using System.Threading;
using System.Threading.Tasks;
using Microsoft.EntityFrameworkCore;
using Microsoft.EntityFrameworkCore.Storage;
using ThreeLayerSample.Domain.Interfaces;

namespace ThreeLayerSample.Infrastructure
{
   	public class UnitOfWork : IUnitOfWork
   	{
          	public DbContext DbContext { get; private set; }
    	private Dictionary<string, object> Repositories { get; }
    	private IDbContextTransaction _transaction;
    	private IsolationLevel? _isolationLevel;

    	public UnitOfWork(DbFactory dbFactory)
          	{
                 	DbContext = dbFactory.DbContext;
        	Repositories = new Dictionary<string, dynamic>();
    	}

    	public async Task<int> SaveChangesAsync(CancellationToken cancellationToken = default)
          	{
                 	return await DbContext.SaveChangesAsync(cancellationToken);
          	}

          	private async Task StartNewTransactionIfNeeded()
    	{
        	if (_transaction == null)
        	{
            	_transaction =  _isolationLevel.HasValue ?
                	await DbContext.Database.BeginTransactionAsync(_isolationLevel.GetValueOrDefault()) : await DbContext.Database.BeginTransactionAsync();
  	      }
    	}

    	public async Task BeginTransaction()
    	{
        	await StartNewTransactionIfNeeded();
    	}

    	public async Task CommitTransaction()
    	{
        	/*
         	do not open transaction here, because if during the request
         	nothing was changed(only select queries were run), we don't
         	want to open and commit an empty transaction -calling SaveChanges()
         	on _transactionProvider will not send any sql to database in such case
        	*/
        	await DbContext.SaveChangesAsync();

        	if (_transaction == null) return;
        	await _transaction.CommitAsync();

        	await _transaction.DisposeAsync();
        	_transaction = null;
    	}

    	public async Task RollbackTransaction()
    	{
        	if (_transaction == null) return;

        	await _transaction.RollbackAsync();

        	await _transaction.DisposeAsync();
    	    _transaction = null;
    	}


          	public void Dispose()
          	{
                 	if (DbContext == null)
                       	return;
                 	//
                 	// Close connection
                 	if (DbContext.Database.GetDbConnection().State == ConnectionState.Open)
                 	{
                       	DbContext.Database.GetDbConnection().Close();
                 	}
                 	DbContext.Dispose();

                 	DbContext = null;
          	}

    	public IRepository<TEntity> Repository<TEntity>() where TEntity : class
          	{
                 	var type = typeof(TEntity);
                 	var typeName = type.Name;

                 	lock (Repositories)
                 	{
                       	if (Repositories.ContainsKey(typeName))
            	{
                	return (IRepository<TEntity>) Repositories[typeName];
            	}

            	var repository = new Repository<TEntity>(DbContext);

                       	Repositories.Add(typeName, repository);
                       	return repository;
                 	}
          	}
	}
}
And another DbFactory class that will initialize a DbContext when we use it.
ThreeLayerSample.Infrastructure/DbFactory.cs
using System;
using Microsoft.EntityFrameworkCore;

namespace ThreeLayerSample.Infrastructure
{
	public class DbFactory : IDisposable
	{
    	private bool _disposed;
    	private Func<DemoContext> _instanceFunc;
    	private DbContext _dbContext;
    	public DbContext DbContext => _dbContext ?? (_dbContext = _instanceFunc.Invoke());

        public DbFactory(Func<DemoContext> dbContextFactory)
    	{
        	_instanceFunc = dbContextFactory;
    	}

    	public void Dispose()
    	{
        	if (!_disposed && _dbContext != null)
        	{
            	_disposed = true;
            	_dbContext.Dispose();
        	}
    	}
	}
}
Business Logic layer
ThreeLayerSample.Service class project in this example.
1. Create an interface for the service
Let’s create the interface for the WorkService that the Presentation layer depends on as we don’t want to tighten the Presentation layer and Business Logic layer with a concrete implementation.
ThreeLayerSample.Domain/Interfaces/Services/IWorkService.cs
using System.Collections.Generic;
using System.Threading.Tasks;
using ThreeLayerSample.Domain.Entities;

namespace ThreeLayerSample.Domain.Interfaces.Services
{
	public interface IWorkService
	{
    	/// <summary>
    	/// Get all items of Work table
    	/// </summary>
    	/// <returns></returns>
    	Task<IList<Work>> GetAll();
    	Task<Work> GetOne(int workId);
    	Task Update(Work work);
    	Task Add(Work work);
    	Task Delete(int workId);
	}
}
2. Implement code for the service
Next, implement business logic processing the Work service in a class named WorkService as follows. This is the business logic processing code, so we put this class in the Business Logic layer. As you can see, the service requests to get all items of the Work table via the Repository instance of the Work entity, which was implemented in the generic repository.
ThreeLayerSample.Service/WorkService.cs
using System;
using System.Collections.Generic;
using System.Threading.Tasks;
using ThreeLayerSample.Domain.Entities;
using ThreeLayerSample.Domain.Interfaces;
using ThreeLayerSample.Domain.Interfaces.Services;

namespace ThreeLayerSample.Service
{
	public class WorkService: IWorkService
	{
    	private readonly IUnitOfWork _unitOfWork;
    	public WorkService(IUnitOfWork unitOfWork)
    	{
        	_unitOfWork = unitOfWork;
    	}

    	public async Task<IList<Work>> GetAll()
    	{
        	return await _unitOfWork.Repository<Work>().GetAllAsync();
    	}

    	public async Task<Work> GetOne(int workId)
    	{
        	return await _unitOfWork.Repository<Work>().FindAsync(workId);
    	}

    	public async Task Update(Work workInput)
    	{
        	try
        	{
            	await _unitOfWork.BeginTransaction();

            	var workRepos = _unitOfWork.Repository<Work>();
            	var work = await workRepos.FindAsync(workInput.Id);
            	if (work == null)
                	throw new KeyNotFoundException();

            	work.Name = work.Name;

          	  await _unitOfWork.CommitTransaction();
        	}
        	catch (Exception e)
        	{
            	await _unitOfWork.RollbackTransaction();
            	throw;
        	}
    	}

    	public async Task Add(Work workInput)
    	{
        	try
        	{
            	await _unitOfWork.BeginTransaction();

            	var workRepos = _unitOfWork.Repository<Work>();
            	await workRepos.InsertAsync(workInput);

            	await _unitOfWork.CommitTransaction();
        	}
        	catch (Exception e)
        	{
            	await _unitOfWork.RollbackTransaction();
            	throw;
        	}
    	}

    	public async Task Delete(int workId)
    	{
            try
        	{
            	await _unitOfWork.BeginTransaction();

            	var workRepos = _unitOfWork.Repository<Work>();
            	var work = await workRepos.FindAsync(workId);
            	if (work == null)
         	       throw new KeyNotFoundException();

            	await workRepos.DeleteAsync(work);

            	await _unitOfWork.CommitTransaction();
        	}
        	catch (Exception e)
        	{
            	await _unitOfWork.RollbackTransaction();
            	throw;
        	}
    	}
	}
}
Presentation layer
ThreeLayerSample.Web(Razor) ASP.NET Core Web App in this example.
Follow this tutorial to create an ASP.NET Core Razor page application.
Once the application is created, create a ServiceCollectionExtensions class under the Extensions folder.
ThreeLayerSample.Web_Razor_/Extensions/ServiceCollectionExtensions .cs
using System;
using Microsoft.EntityFrameworkCore;
using Microsoft.Extensions.Configuration;
using Microsoft.Extensions.DependencyInjection;
using ThreeLayerSample.Domain.Interfaces;
using ThreeLayerSample.Domain.Interfaces.Services;
using ThreeLayerSample.Domain.Models;
using ThreeLayerSample.Infrastructure;
using ThreeLayerSample.Service;

namespace ThreeLayerSample.Web_Razor_.Extensions
{
   	public static class ServiceCollectionExtensions
	{
    	/// <summary>
    	/// Add needed instances for database
    	/// </summary>
    	/// <param name="services"></param>
    	/// <param name="configuration"></param>
    	/// <returns></returns>
    	public static IServiceCollection AddDatabase(this IServiceCollection services, IConfiguration configuration)
    	{
        	// Configure DbContext with Scoped lifetime
            services.AddDbContext<DemoContext>(options =>
            	{
                    options.UseSqlServer(AppSettings.ConnectionString,
                    	sqlOptions => sqlOptions.CommandTimeout(120));
                    options.UseLazyLoadingProxies();
            	}
        	);

        	services.AddScoped<Func<DemoContext>>((provider) => () => provider.GetService<DemoContext>());
            services.AddScoped<DbFactory>();
        	services.AddScoped<IUnitOfWork, UnitOfWork>();

        	return services;
    	}

    	/// <summary>
    	/// Add instances of in-use services
    	/// </summary>
    	/// <param name="services"></param>
    	/// <returns></returns>
    	public static IServiceCollection AddServices(this IServiceCollection services)
    	{
        	return services.AddScoped<IWorkService, WorkService>();
    	}
	}
}
Add your connection string into the appsettings.json file, and it’s the connection string that the Data Access layer will employ to establish a connection to the database (same value as the connection string in the Scaffold command).
ThreeLayerSample.Web_Razor_/appsettings.json
{
  "Logging": {
	"LogLevel": {
  	"Default": "Information",
  	"Microsoft": "Warning",
  	"Microsoft.Hosting.Lifetime": "Information"
	}
  },
  "AppSettings": {
	"ConnectionString": "Data Source=(local);Initial Catalog=ThreeLayerSample.Database;Persist Security Info=True;User ID=sa;Password=PASSWORD;MultipleActiveResultSets=True"
  },
  "AllowedHosts": "*"
}
Add an AppSettings class to the Entity layer.
ThreeLayerSample.Domain/Models/AppSettings.cs
namespace ThreeLayerSample.Domain.Models
{
	public class AppSettings
	{
    	public static string ConnectionString { get; private set; }
	}
}
Open the Startup.cs file, then add the following codes.
At its constructor: read data from appsettings.json, then store it in the created AppSettings class.
In the ConfigureServices: register instances for DataContext, its Factory, UnitOfWork, and WorkService to the application (using extension methods in ServiceCollectionExtensions class).
ThreeLayerSample.Web_Razor_/Startup.cs
using Microsoft.AspNetCore.Builder;
using Microsoft.AspNetCore.Hosting;
using Microsoft.Extensions.Configuration;
using Microsoft.Extensions.DependencyInjection;
using Microsoft.Extensions.Hosting;
using System;
using ThreeLayerSample.Domain.Models;
using ThreeLayerSample.Web_Razor_.Extensions;

namespace ThreeLayerSample.Web_Razor_
{
	public class Startup
	{
    	public Startup(IWebHostEnvironment env)
    	{
        	Configuration = InitConfiguration(env);
    	}

    	public IConfiguration Configuration { get; }

    	// This method gets called by the runtime. Use this method to add services to the container.
    	public void ConfigureServices(IServiceCollection services)
    	{
        	services.AddDatabase(Configuration)
            	.AddServices();
        	//
        	services.AddRazorPages();
    	}

    	// This method gets called by the runtime. Use this method to configure the HTTP request pipeline.
    	public void Configure(IApplicationBuilder app, IWebHostEnvironment env)
    	{
        	if (env.IsDevelopment())
        	{
                app.UseDeveloperExceptionPage();
        	}
        	else
        	{
            	app.UseExceptionHandler("/Error");
            	// The default HSTS value is 30 days. You may want to change this for production scenarios, see https://aka.ms/aspnetcore-hsts.
            	app.UseHsts();
        	}

        	app.UseHttpsRedirection();
        	app.UseStaticFiles();

        	app.UseRouting();

        	app.UseAuthorization();

        	app.UseEndpoints(endpoints =>
        	{
            	endpoints.MapRazorPages();
        	});
    	}

    	private IConfiguration InitConfiguration(IWebHostEnvironment env)
    	{
        	// Config the app to read values from appsettings base on current environment value.
        	var configuration = new ConfigurationBuilder()
                .SetBasePath(AppDomain.CurrentDomain.BaseDirectory)
            	.AddJsonFile("appsettings.json", false, true)
            	.AddJsonFile($"appsettings.{env.EnvironmentName}.json", true, true)
                .AddEnvironmentVariables().Build();
        	//
        	// Map AppSettings section in appsettings.json file value to AppSetting model
        	configuration.GetSection("AppSettings").Get<AppSettings>(options => options.BindNonPublicProperties = true);
        	return configuration;
    	}
	}
}
Open Index.cshtml.cs file, add the following code to inject WorkService, then get data from WorkService and set it to Works property.
ThreeLayerSample.Web_Razor_/Pages/Index.cshtml.cs
using Microsoft.AspNetCore.Mvc;
using Microsoft.AspNetCore.Mvc.RazorPages;
using Microsoft.Extensions.Logging;
using System;
using System.Collections.Generic;
using System.Linq;
using System.Threading.Tasks;
using ThreeLayerSample.Domain.Entities;
using ThreeLayerSample.Domain.Interfaces.Services;

namespace ThreeLayerSample.Web_Razor_.Pages
{
	public class IndexModel : PageModel
	{
    	private readonly ILogger<IndexModel> _logger;
    	private readonly IWorkService _workService;

    	public IList<Work> Works { get; private set; }

    	public IndexModel(ILogger<IndexModel> logger, IWorkService workService)
    	{
        	_logger = logger;
        	_workService = workService;
    	}

    	public async Task OnGetAsync()
    	{
        	Works = await _workService.GetAll();
    	}
	}
}
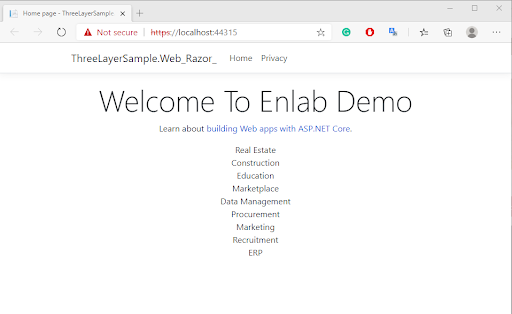
In the Index.cshtml file, add the following code to present data to the UI.
ThreeLayerSample.Web_Razor_/Pages/Index.cshtml.
@page
@model IndexModel
@{
	ViewData["Title"] = "Home page";
}

<div class="text-center">
	<h1 class="display-4">Welcome To Enlab Demo</h1>
	<p>Learn about <a href="https://docs.microsoft.com/aspnet/core">building Web apps with ASP.NET Core</a>.</p>

	@foreach (var item in Model.Works)
	{
    	<div>@item.Name</div>
	}
</div>
Testing
Run the application to check for the result.

Deployment
Create a folder to store your source code.
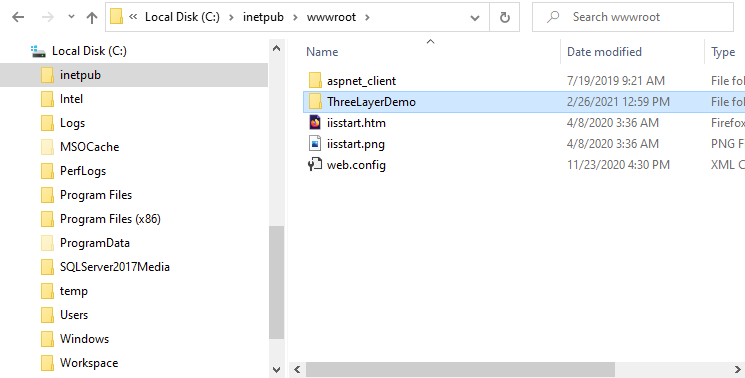

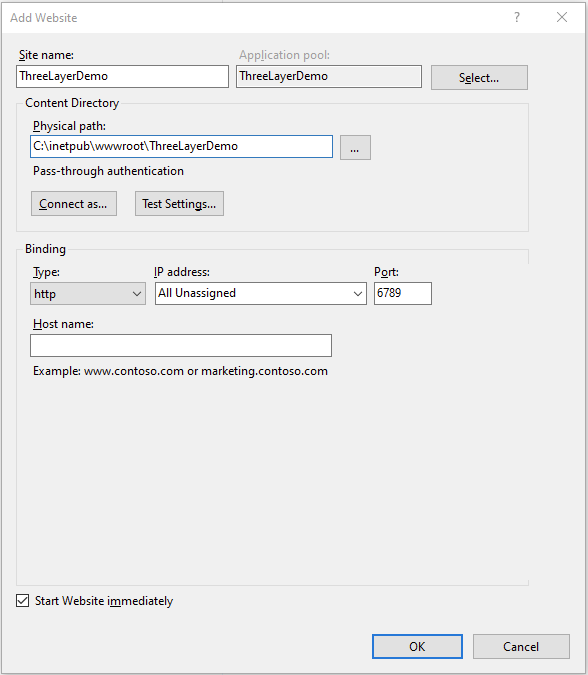
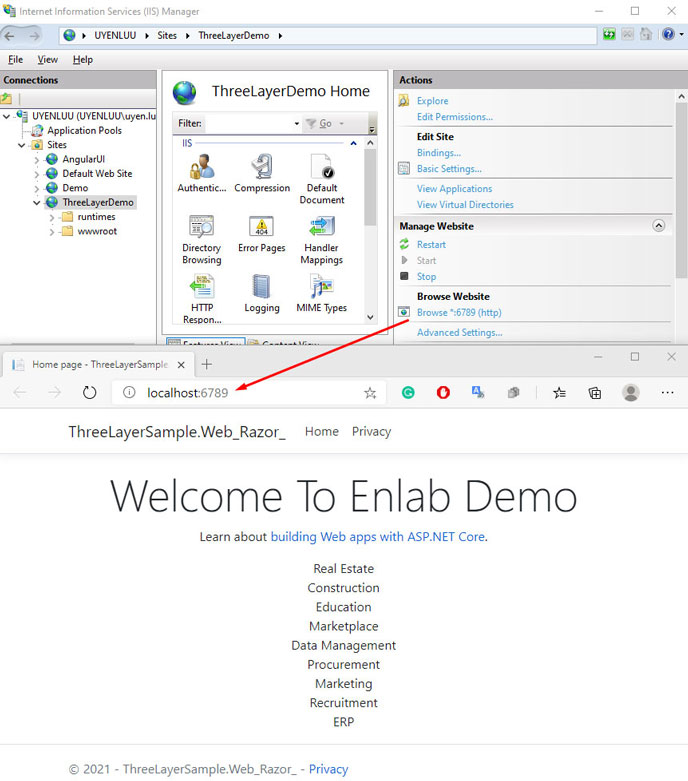
Open your IIS, then choose Create Website to host your application. Provide a name, a specific port, and a physical path to the source code folder for the Content Directory section. Make sure “Start website immediately” is ticked.

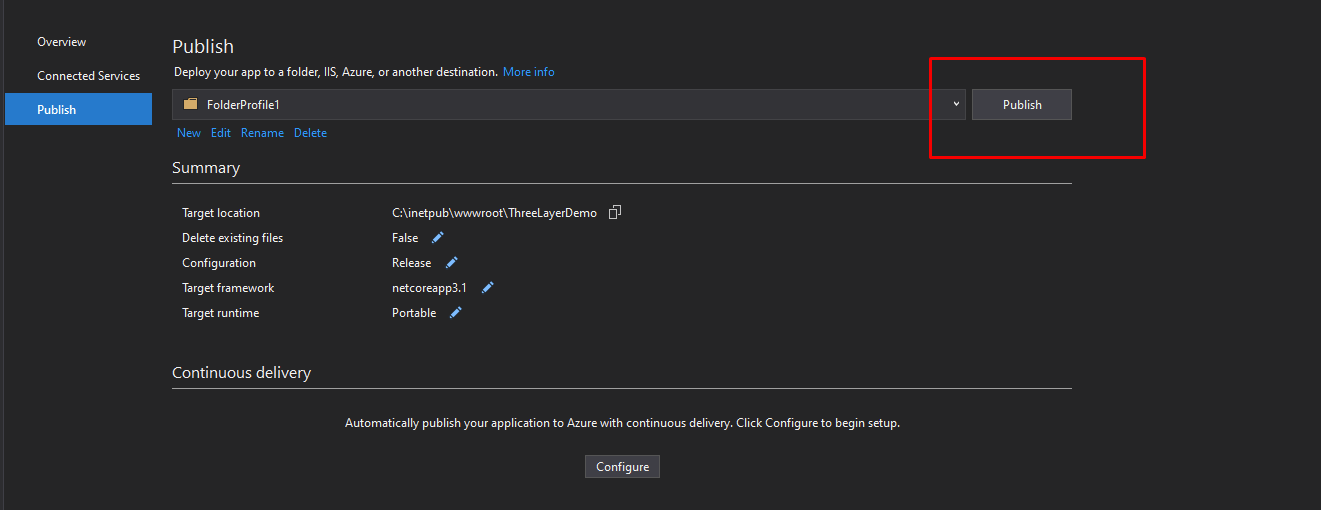
Open your solution in your Visual Studio, then follow these steps:
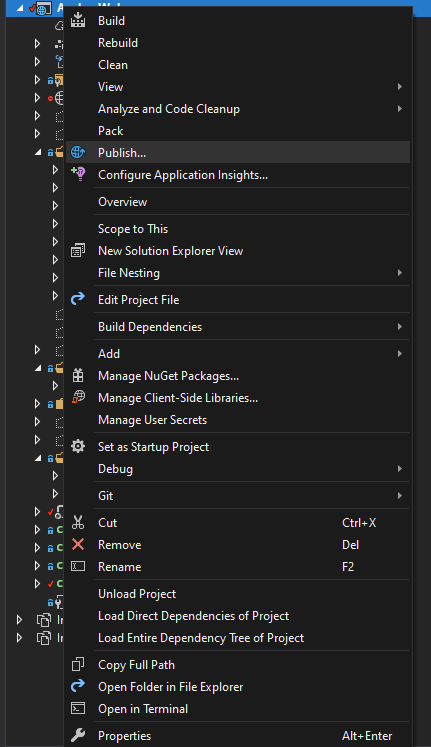
Right-click on ThreeLayerSample.Web(Razor), select Publish.

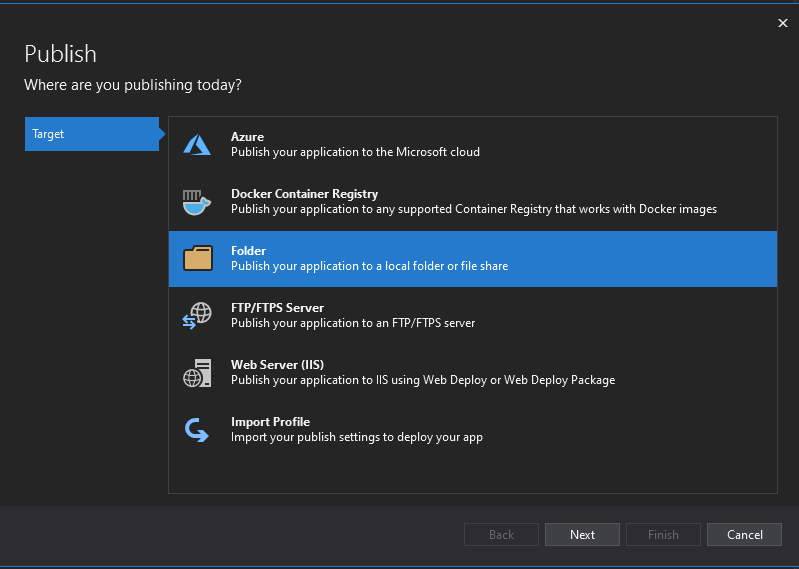
Select “Folder”.

Enter “Folder location” by creating the source code folder path below.
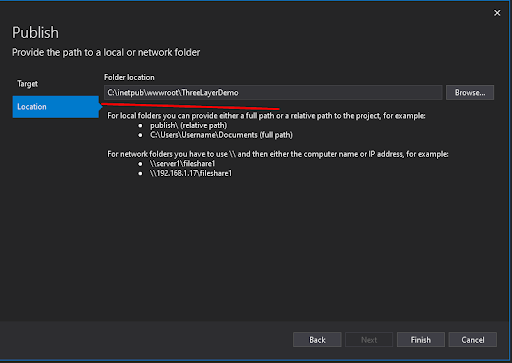

Click to publish the project.

Once you’ve done publishing, open the application on your browser to check for the result.

Conclusion
The layered architecture is well-designed for software development that helps organize your code with high maintainability, reusability, and readability. However, even though codes are well-organized in layers, they are deployed and run on the same physical machine, even on the same process. This may not be the right choice for complex applications, which require high availability and stability. We need to upgrade this architecture to another higher level named three-tier architecture, which I will share in my next article.
Thank you for reading, and happy coding!


References
- Loc Nguyen, How to implement Repository & Unit of Work design patterns in .NET Core with practical examples [Part 1], enlabsoftware.com/, 2021.
- Anant Patil, Three Layered Architecture, www.ecanarys.com.
- Mark Richards, Software Architecture Patterns, www.oreilly.com.